Make: Three Ways To Make a Mallet
This video was published on the Make channel.
Mallets are incredibly useful when working with wood. This video shows three different ways to create a mallet for your woodworking projects.
Building & Making on Youtube
Darbin Orvar - Girl in a Shop
My adventures in building, diy, construction, testing and finishing.
This video was published on the Make channel.
Mallets are incredibly useful when working with wood. This video shows three different ways to create a mallet for your woodworking projects.
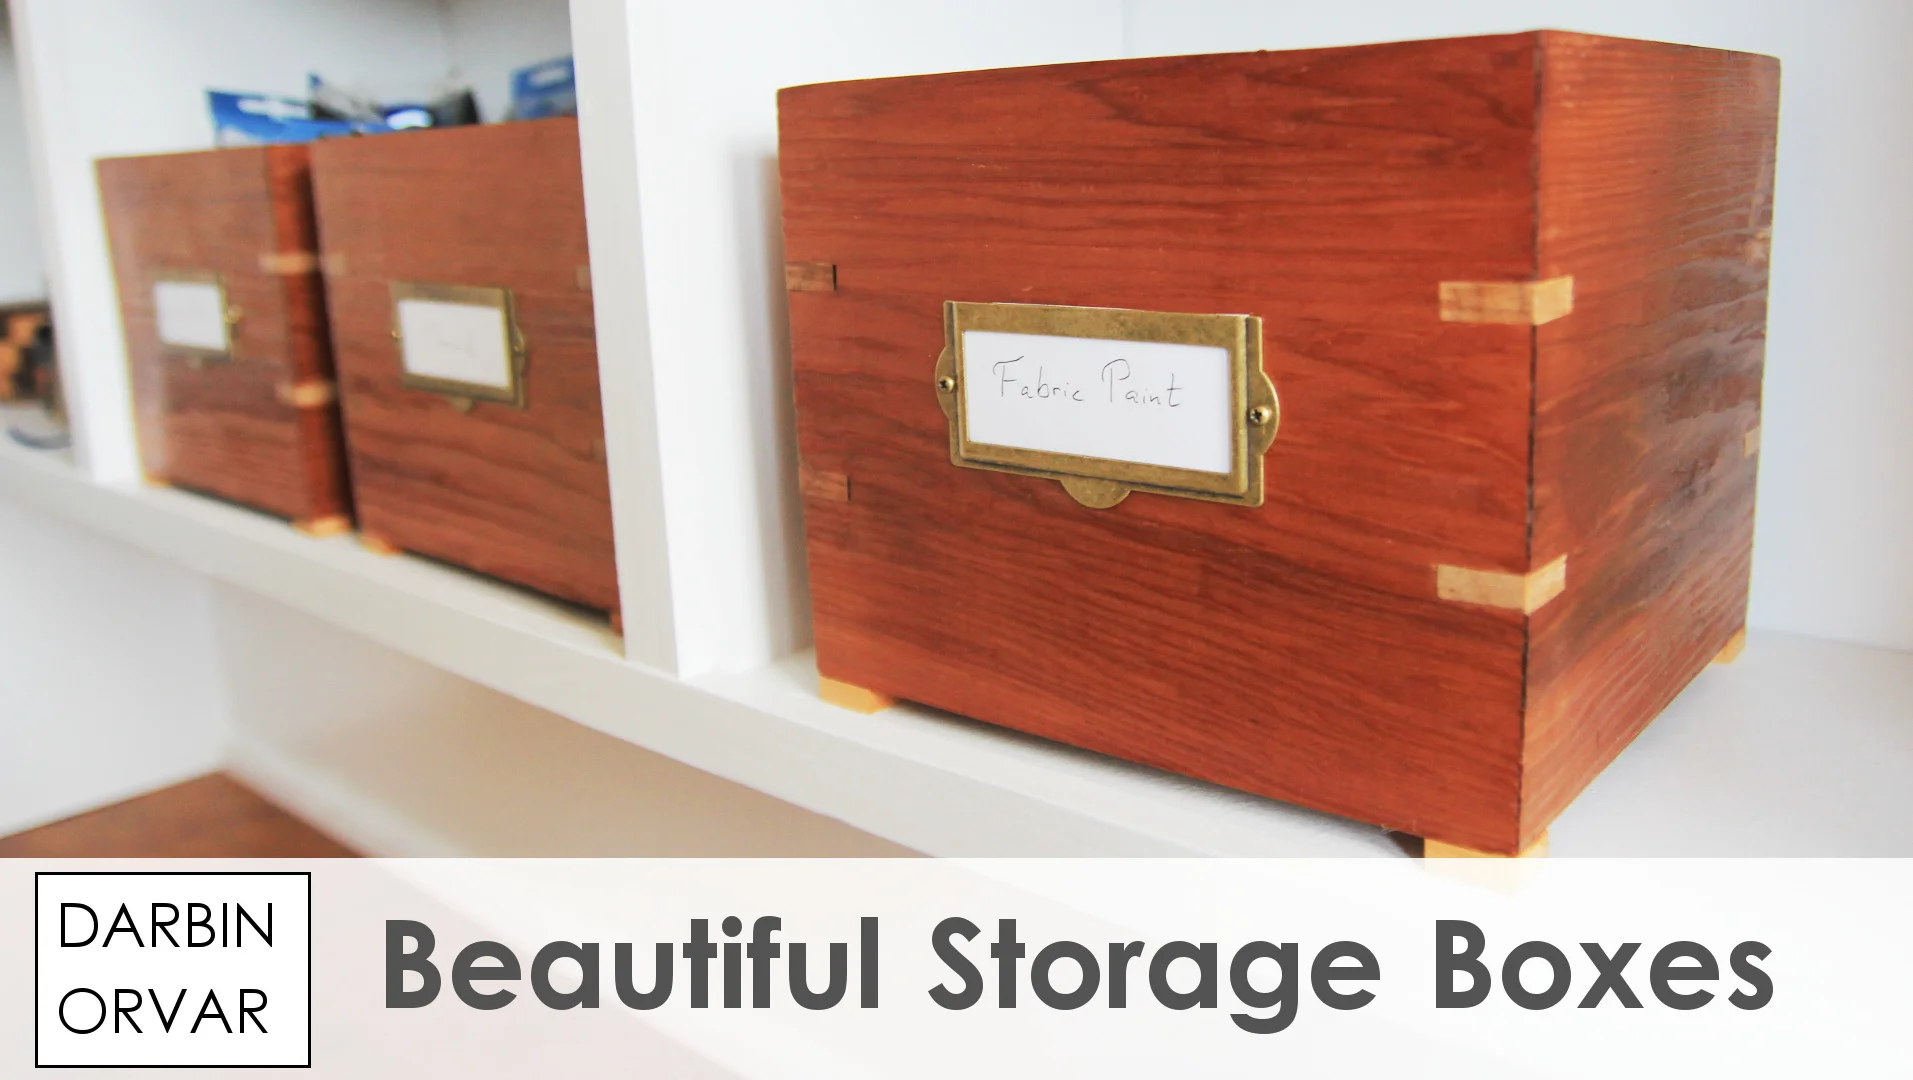
I wanted to build a couple of really nice looking boxes that I could use for organizing and storing some art supplies. For the boxes I decided to use cedar wood, as well as maple for splices. I also used some card holders and they turned out just great. Let's see how I built them.
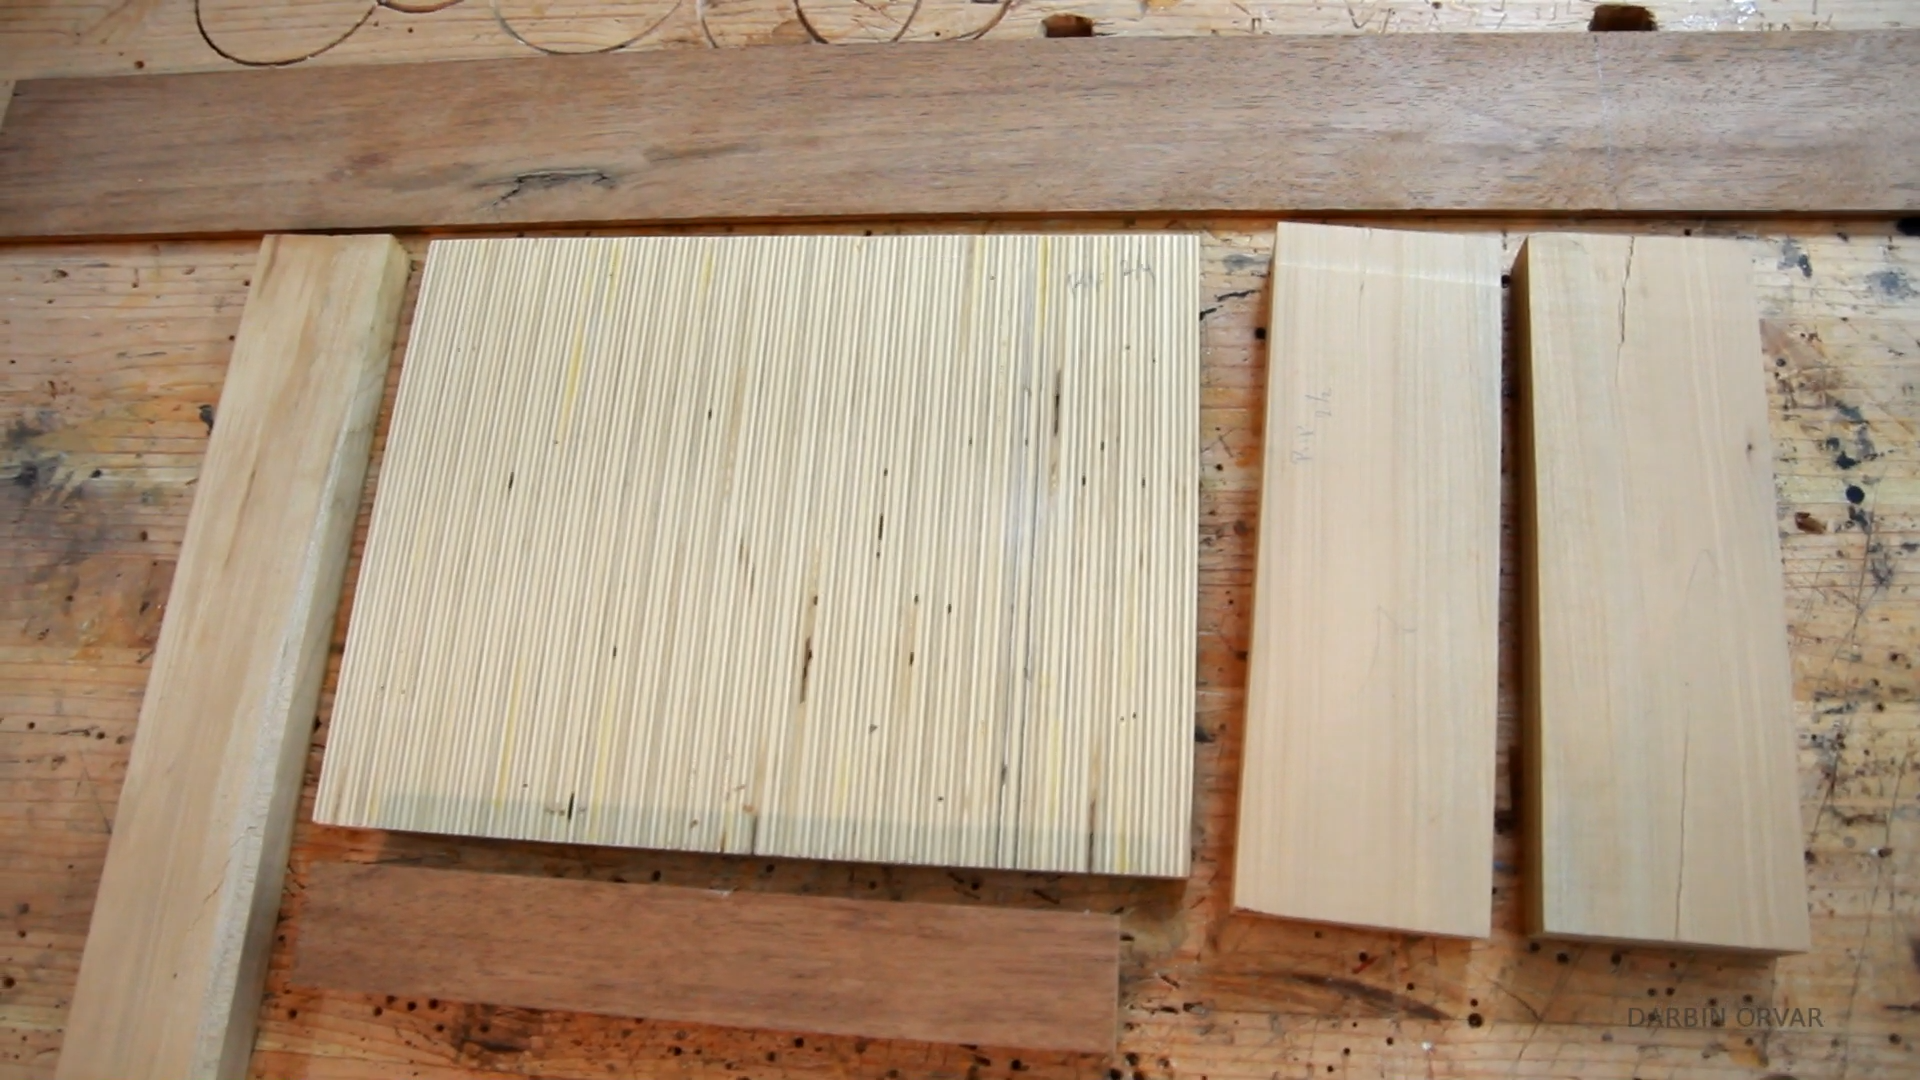
So I started out with measuring the length of my shelves and they measure 17 inches. I'd like to be able to put two boxes on shelf, so I figured 7 1/2 inches would be a good length for each box.

For wood, I decided to use some cedar I had around, so I re-sawed it on the table saw in batches to get thinner stock.
Once my pieces were cut I ran them through the planer a couple of times.
Now to cut the wood up I set up a stock block on my miter saw and I cut a bunch of mitered pieces. Once I was done with one cut, I changed the stop block to get the second size done.
I want the bottoms to sit inside a rabbet in the boxes so I'm using the router table here to make a groove the thickness of the wood which is about 1/4 of an inch.
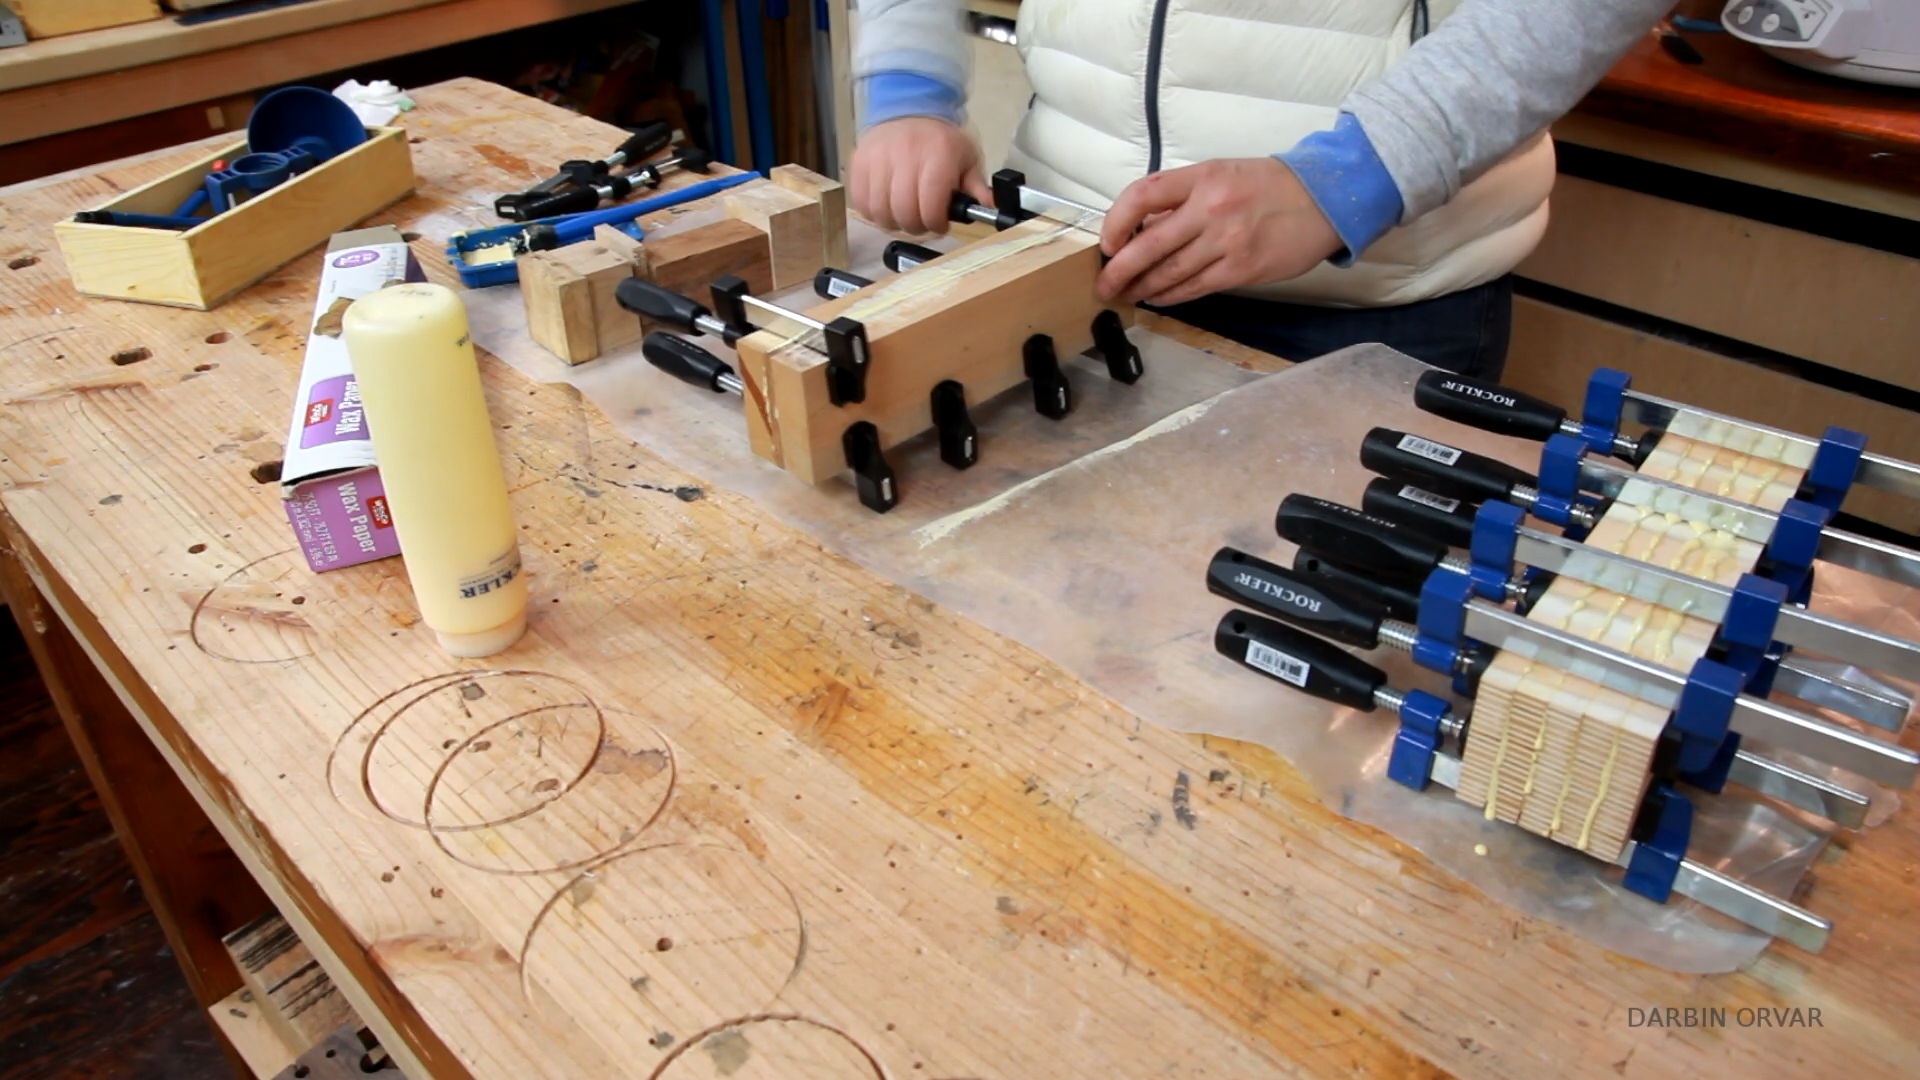
Time to glue the boxes together. I'm using some masking tape here to secure the sides together, then flip around, put down some glue, and fold the box together. This technique works really well with mitered corners which can be a little tricky to get right. Then just checking for square and repeating with the remaining two boxes.
Now, I'm going to use a spline jig here to add some splines, I added eight splines on each box. I set the jig up with a 1/4 inch bit.

For the splines I'm cutting up a piece of maple for strips. So putting one in, measuring and then cutting up a bunch of small pieces. Then gluing them in. Some were just a touch too thick, so I'm sanding them down so they go in a littl easier.
For the splines here I was first planning on using walnut, but then I was thinking and cedar darkens quite a bit over time and as you finish it, so I decided to go lighter instead with some maple.
For the bottoms I'm gluing the end grain, to account for wood movement over time, and then just adding a couple of tack nails.
Once the glue had dried I used the Japanese saw to cut the splines off, and the trick is to try to not cut too closely, but give yourself a little room to sand down instead so you don't scratch the wood.
Then I sanded the boxes. And here you can also see I glued on a couple of maple pieces for feet as well to match the splines.

Now to finish the boxes I decided to go with shellac. I think shellac is a little under utilized. It's a natural finish, it dries really quickly, and it always comes out nice.
Once that had dried, I applied some wax polish with steel wool to completely smoothen out the surface and add a soft finish. And then buffing it out.
For a finishing touch I'm adding some label holders, and just measuring out the center here. Then pre-drilling lightly and screwing in. And that looks really nice.
Now it's just a matter of bringing them in and filling them up.
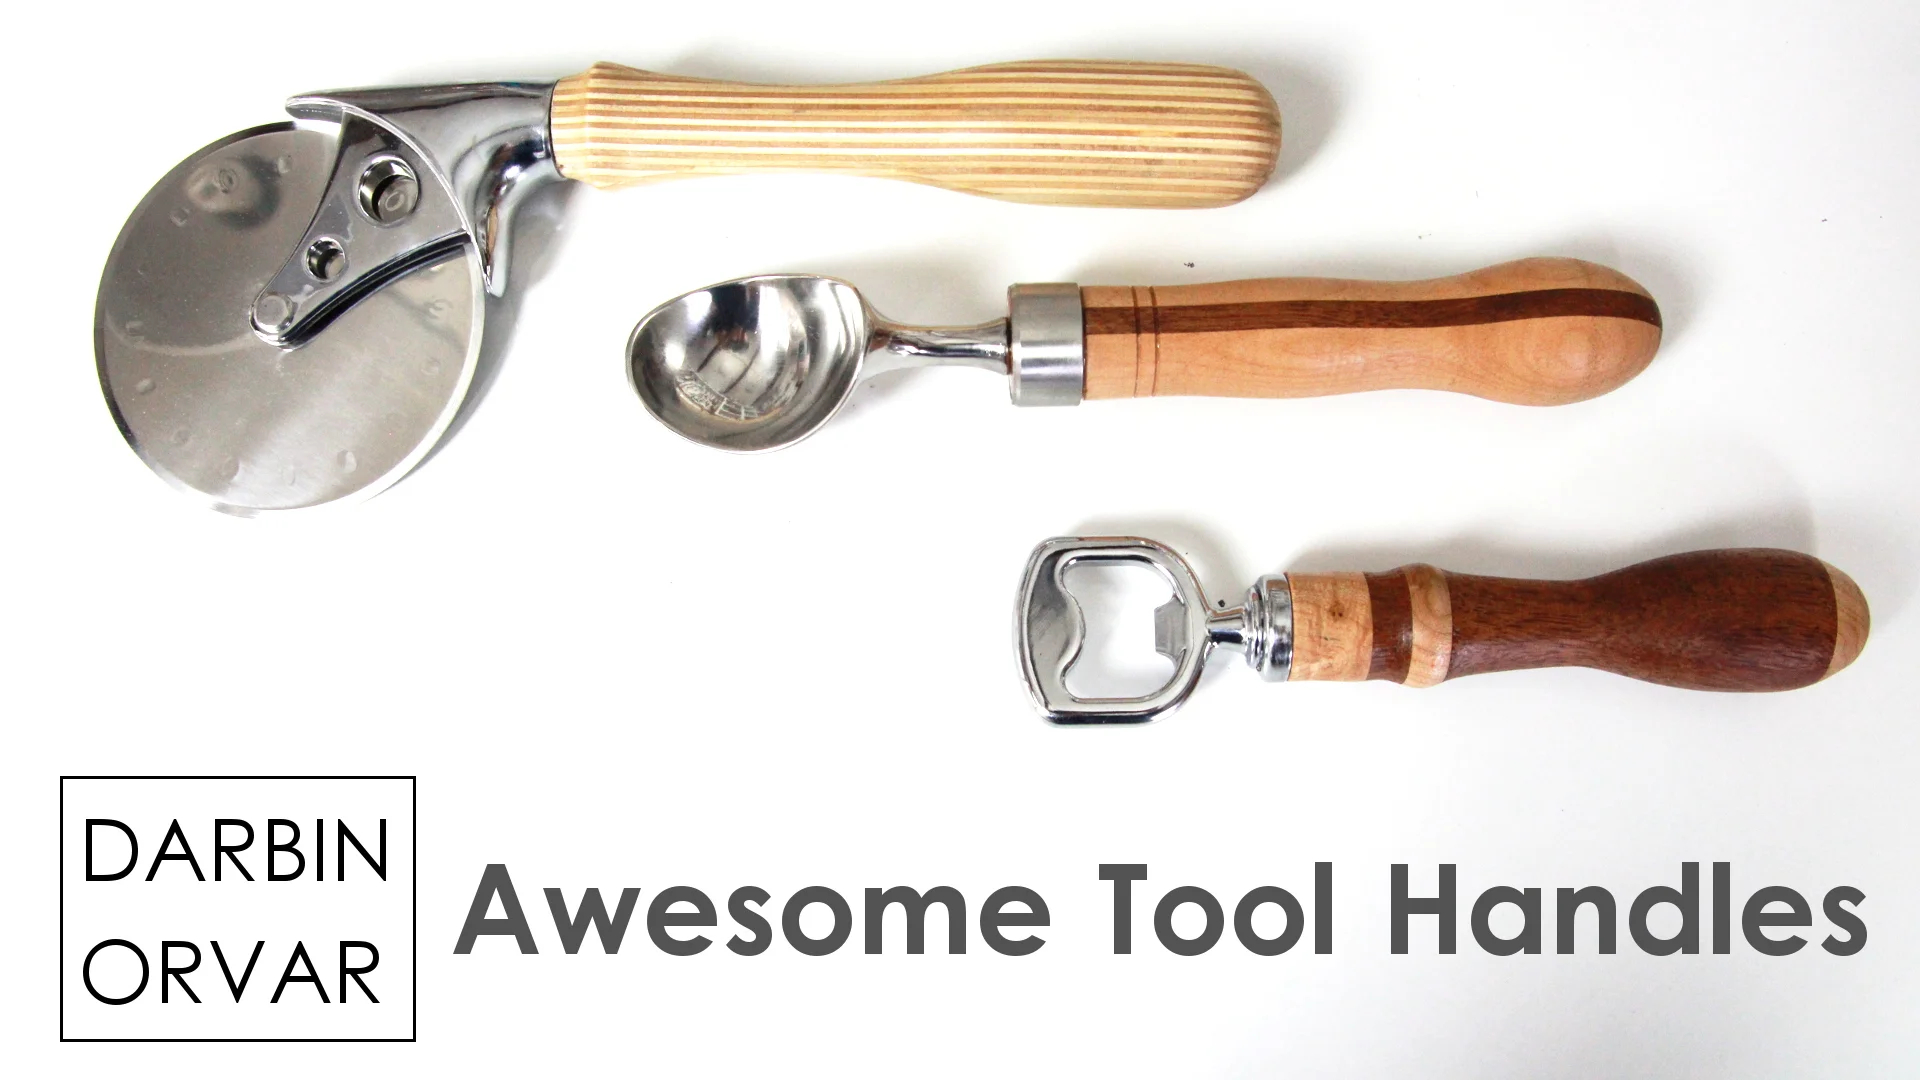
Making your own tool handles on the lathe is a really fun projects. I'm going to be making some handles for a couple of different kitchen tools, however you could use the same concepts to make handles for chisels, files, knives - or whatever you need. By gluing up different woods you can get some really cool designs, and it's also a perfect opportunity to use up scrap wood!
So for this project I looked through my scrap bin and I found a couple of pieces which I thought would be cool to utilize. When you glue together pieces of wood for the purpose of turning, you can get really creative and make all sorts of patterns and cool designs by gluing wood together. While in a block, it might not look like much, but once you start turning, your patterns will emerge.
I decided to use some maple and ipe scraps, and I also have this piece of plywood. I created it by cutting Baltic birch plywood in thin strips, turn them on end, and glue them together for a cool affect. I cut this board up in a couple of pieces.
I wanted to create a kind of striped look one, horizontal design and one verical. So I cut up the wood in smaller pieces, and then arranged in a few different ways to glue up.
I used regular yellow glue, made sure I got good coverage and I made sure to clamp all the blanks really well.
Once it had dried, I cleaned up the blocks on the bandsaw.
First step here is finding the center on both sides and making a mark, so it's easier to put them on the lathe.
At that point I was ready to start turning, and this first one is maple and ipe. After a little rough turning, I made a tenon, so I could put it in the chuck for some extra support.
I like to start with a roughing gouge first and then move on to a square bit tool. I'm using carbide tools and they work really well.
The handle for the ice cream scoop comes with a ferrule, so I'm checking the interior diameter of the ferrule and then working on getting the wood down to that size.
Then for making rounder shapes, I'm using the round carbide tool here, which works really nice and for marking the end sections as well as creating some decorative lines I'm using the parting tool.

Here I'm working on the plywood block, and this one was a little trickier to turn, it chipped quite easily, so I moved to the round bit quite early on and it did a much better job, plus I also sanded this one quite aggressively and that worked much better for this material. This handle is for the pizza cutter.
I really like to finish pieces on the lathe, and this time I decided to go with shellac. It goes on so nicely and it also dries super quickly since it's spinning so fast.
And finally I'm turning the piece meant for the opener.
Working on the lathe is so much fun. It's one of those tools that you didn't really know you wanted or needed, until you actually try one out and start playing with it. I've been using mine now for a couple of months and I've turned lots of little accessories, knobs and things like that as well as handles and even a baseball bat. So you don't need a huge lathe to be able to make lots of cool things with it.
Once I had all the handles turned, I used a compass to find the center. Here I'm marking out the depth of this threaded insert which is meant to screw inside the handle, so the tool can attach to it.

So drilling holes in all the handles and then screwing in the threaded insert. And it creates groves on the inside so it grips to the wood, and then simply spinning in the attachment.
For the ice cream scoop I simply epoxied in the ferrel and the scoop part, and then set it in a clamp to dry.

After sanding all to handles with some fine sand paper, I applied some of tung oil wax polish to bring out the color and add a nice feel.
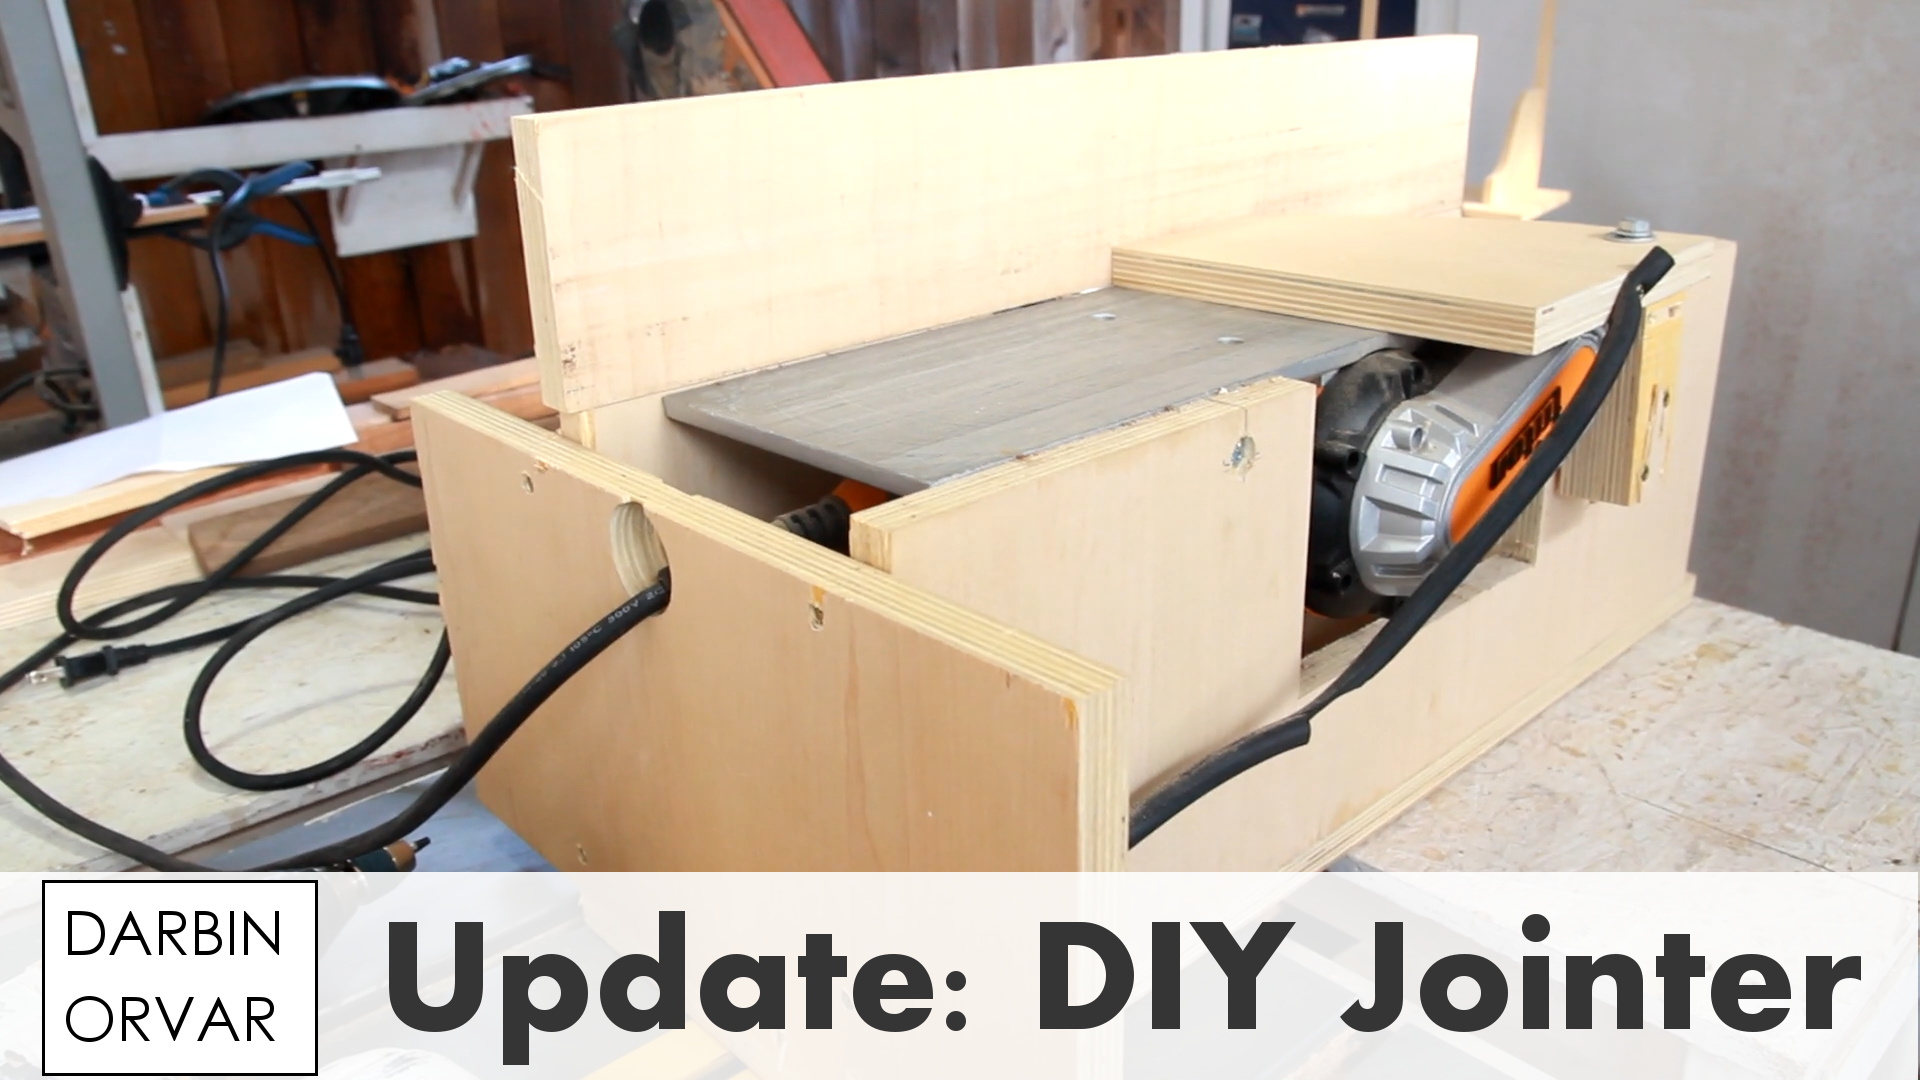
In this shop update I go over how I made my DIY jointer with a power planer, as well as mail time and some of my thoughts.

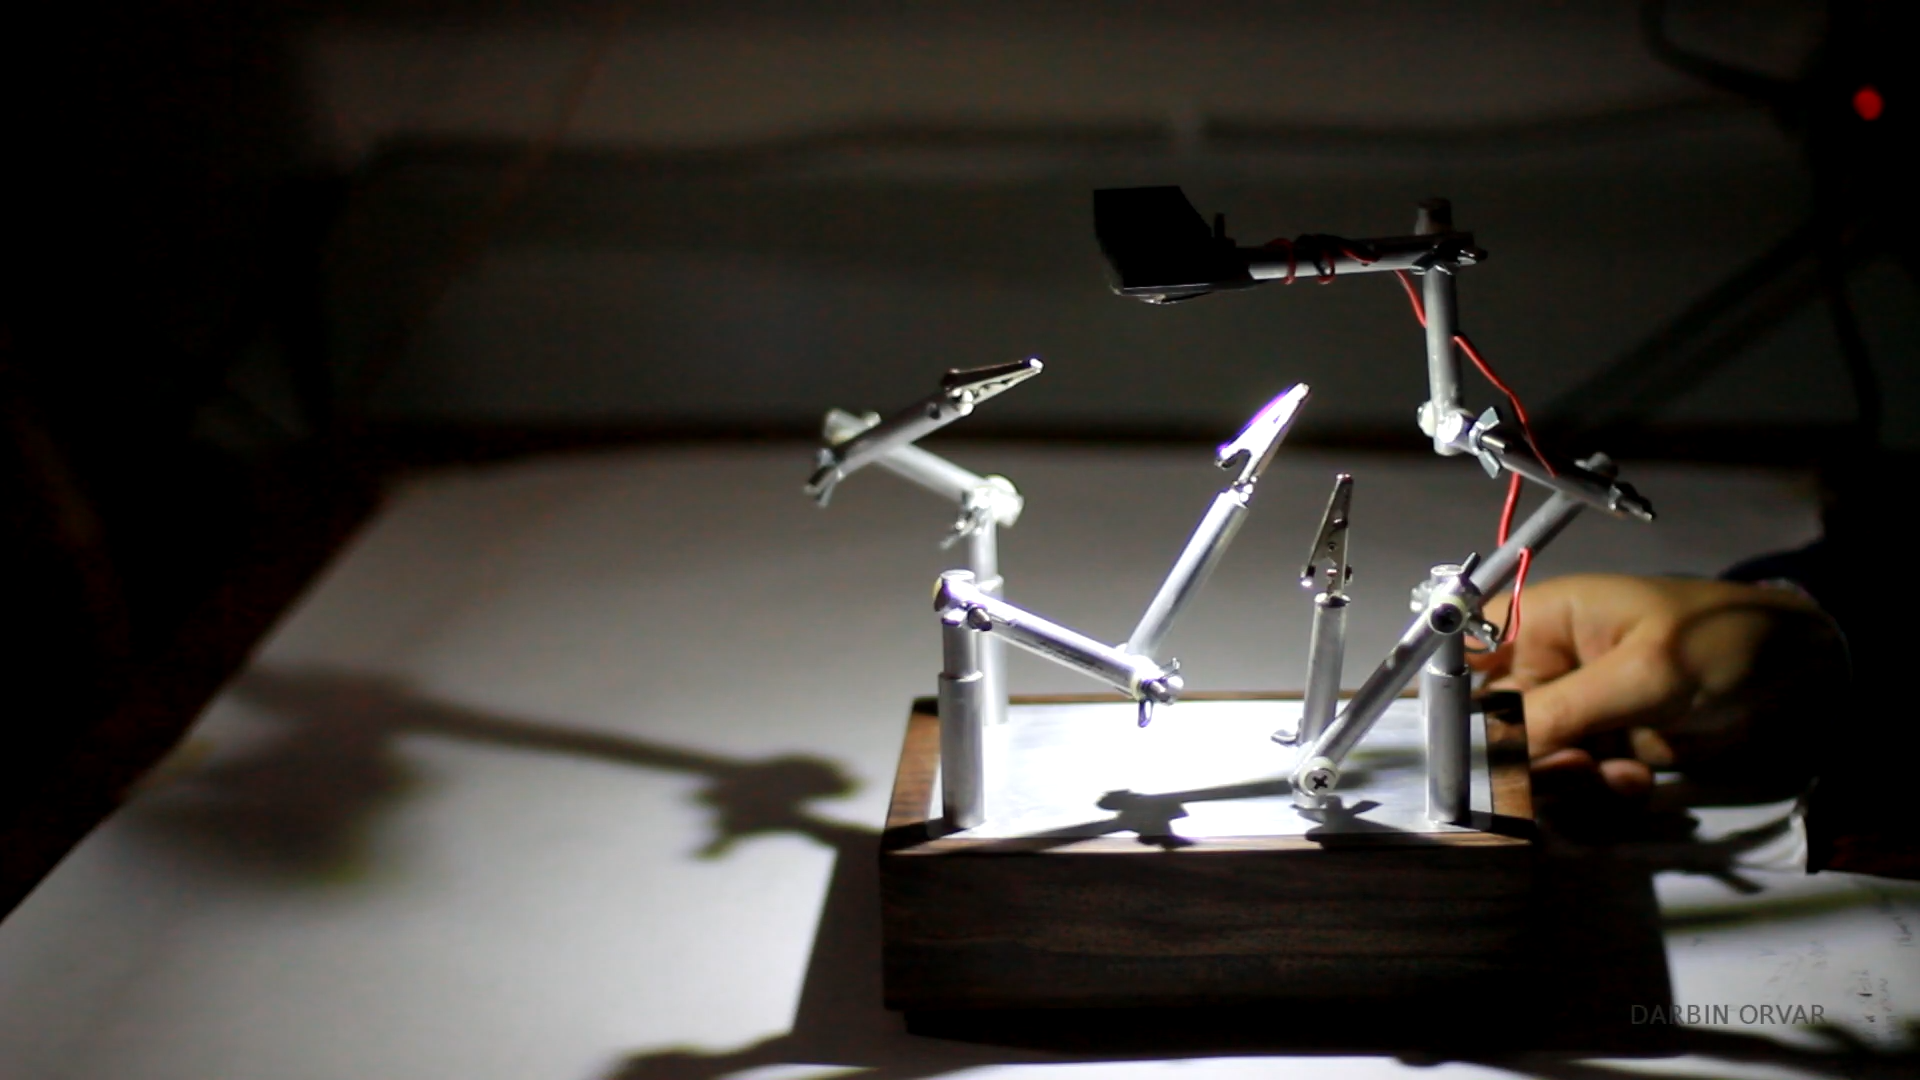
Using walnut and 6 mm aluminium w/ a 10 watt LED bulb I create a task lamp for my electronics table that also features a set of third hands.
So starting out, I'm using a thick 2 inch piece of walnut, however if you don't have access to that, you can laminate several pieces together to accomplish this depth. The walnut I'm using measures 5 x 7 x 2 inches.
I want the aluminum to sit inset in the walnut, so I used the xcarve which is a CNC machine to carve out a 1/4 " indention on the top of the walnut.
Once that was done, I flipped the piece over, and designed another section on the xcarve. This area is for housing some electronics for the light.

For the inset I'm working with a thick 1/4 inch piece of aluminum and I'm using a really fine bit to carve out the area I need cut, where the holes need to go. While you could carve all the way through the aluminum, I decided to just scratch the piece to show the areas that needed to be cut and drilled, because it's a lot faster.
So once I had my outline, I cut it up with the bandsaw and then I did a fair amount of sanding on the beltsander to smooth the edges. Next I proceeded to drill out the holes in the corners. So I started with a small drill bit, then got a slightly bigger one, an even bigger one and so on, until I reached the half inch I needed.
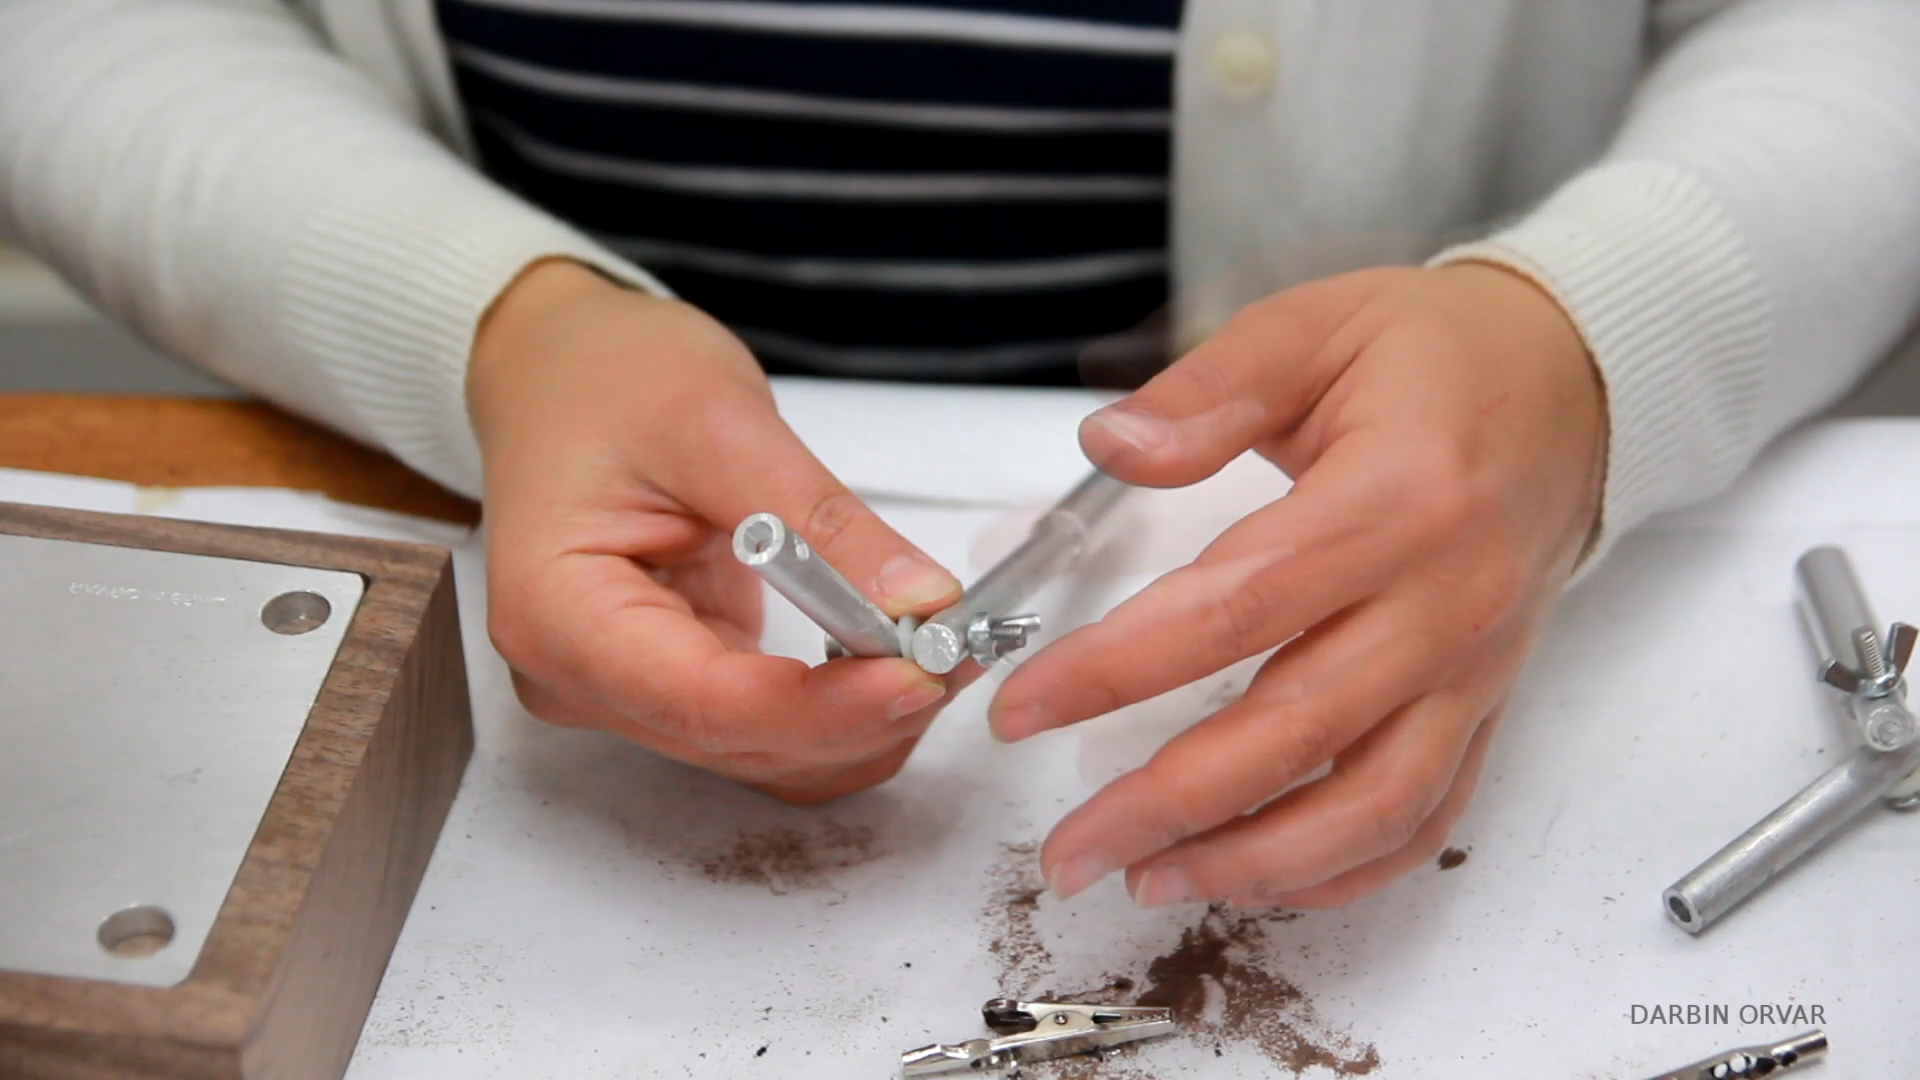
For the arms, I'm using 3/8 inch aluminum rods, as well as rods with an interior dimension of 3/8 inch, so one fits within the other. I debated for a while how to design the arms, finally I settled on using small pieces of aluminum rods connected with screws through holes and tightened with wing nuts.

To create this I first need to cut up a whole bunch to size, and I'm doing this on the bandsaw. You can make these any size you'd like, as you're piecing several pieces together to create one arm, I choose to make most sections 3 inches long. And then I need to drill holes in them on each end and it really helps to have the pieces secured in a metal vice here. You can either use a drill press or a drill.
For the ends of the 3rd hands I'm going to attach some alligator clips, so I need to drill some holes down those solid aluminum rods as well. I'm using the drill press for that.
So for the light, I'm going to use a super bright 10 watt LED. I'm going to attach it to a piece of aluminum measuring 2 x 2 inches. I cut this section out on the bandsaw, however you could certainly carve it out on the xcarve. 10 watt LEDs require 30 volts, so I'm going to need a booster to up the voltage.
To hold the light, I have the 2 x 2 inch piece of aluminum. I also have one of the solid rod pieces and I cut a groove using the bandsaw (about 1/4 inch down, cutting a couple of times to accomplish a 1/4 inch depth), and then I'm fitting the square piece into the groove of the rod. To secure it in place I have a screw through with a nut on the other side.
Now on the side of the walnut I need a hole for the power cord and I also want a switch to turn the light on and off. So I'm drawing out the size of the switch, and first I drilled two holes, one for the switch and one for the power cord. Then I'm chiseling out the area for the switch to fit in perfectly.
To connect the arms together, I'm putting a machine screw through the holes I drilled, and then securing that with nylon washers in between. To tighten everything I'm using wing nuts and that way I can adjust whatever angle I need. Then I have some alligator clips that I can fit in the holes drilled in the top aluminum pieces here.
Now time to attach everything together. So I'm mixing up some epoxy and I'm fitting the alligator clips in the rods. And I'm also gluing the aluminum to the walnut.
Ok, so next I'm epoxying in the hollow aluminum into the corners. And I have cut the one on the far left a little shorter, that's for the light. So just carefully gluing them all in. So to connect everything, first I'm tinning a wire with some solder. I'm using a continuity tester to see where to solder the power to on the switch. And then attaching the wire to the switch and soldering it in place.
Now there's a hole drilled through the section where the light will go, so I'm feeding some wires through that. And then I'm connecting them to the booster which will fit into this carved out area.Then I'm attaching the switch through the hole here with some hot glue.
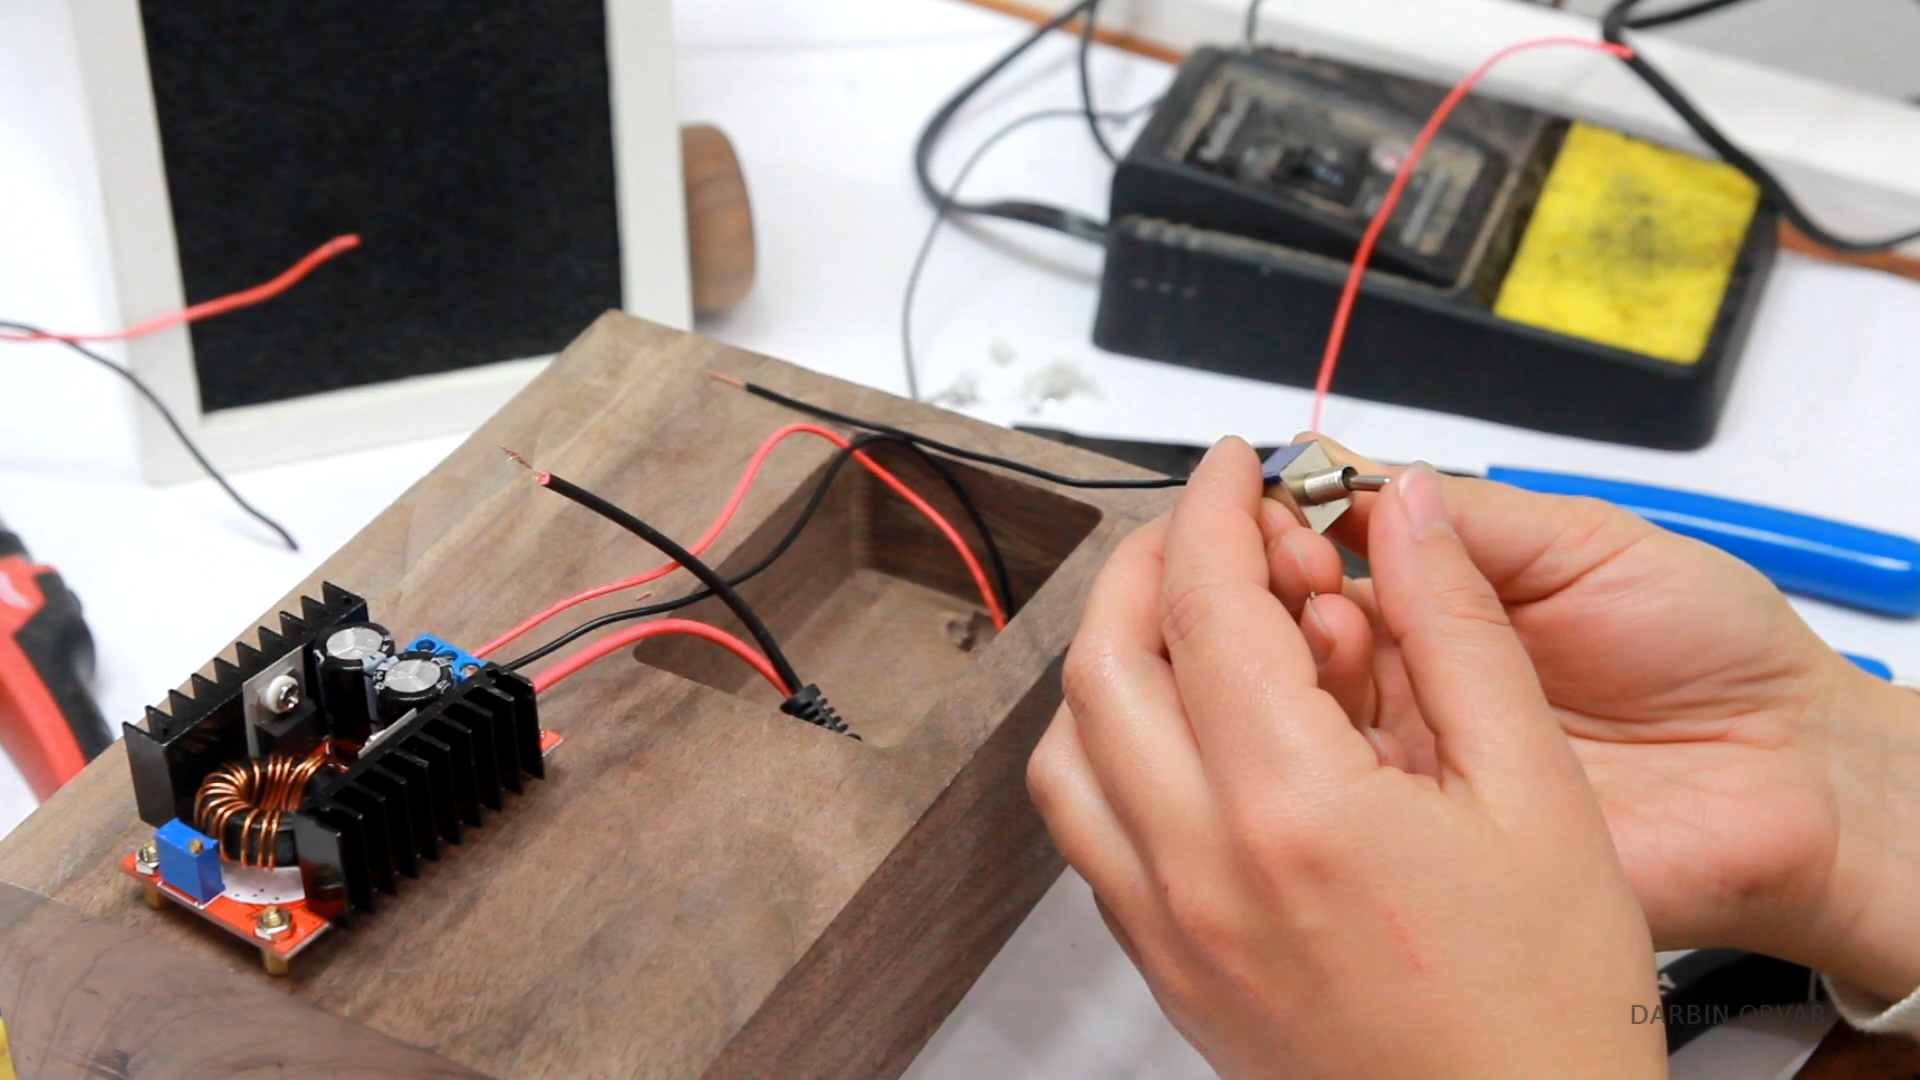
I have a power cord here attached to the booster, so that is going in the second hole I have prepared here. And then gluing the booster down. Now all the electronics are in place.
To get the whole unit off the ground, I'm cutting off some pieces of rubber here to make little feet and hot gluing those on as well. So the wires are coming up through one of the hollow tubes, so I'm just going to test the light here, and it works. It's super bright.
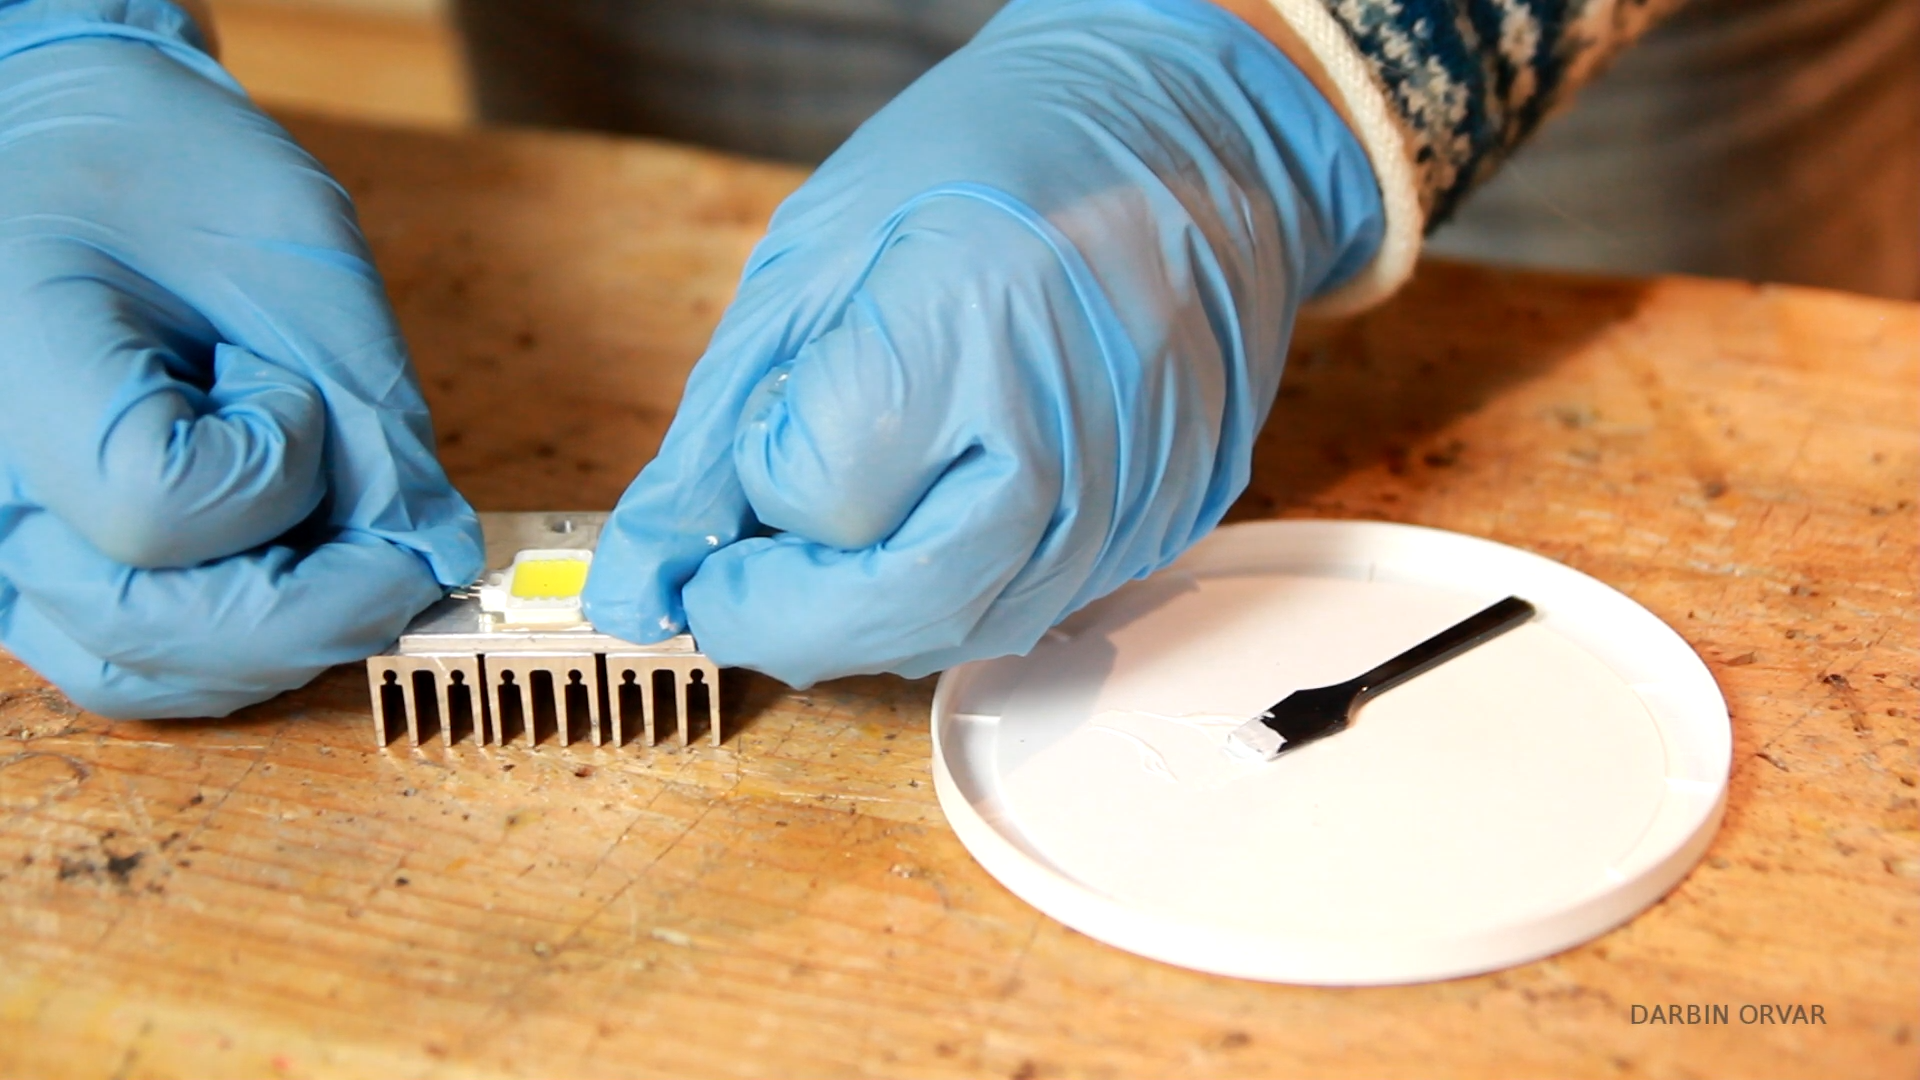
Let's work on the light. The 10 watt LED gets pretty hot so I decided to attach some heatsinks on the backside. I did numerous tests to determine how many heat sinks I needed, and I even anticipated using a small fan which I didn't end up needing. So here I'm cleaning up the metal to prepare the surfaces. To attach the heatsinks to the aluminum I'm using thermal adhesive. So I'm mixing the two tubes together, and putting on a light coat on each heatsink, then it should be clamped so I'm carefully putting on this piece of osage orange because it's pretty heavy.
I let that dry for another, then I turned it around, and glued on the LED light to the other side. So here you can see I have the wires going up through the light part here through holes I've drilled. And I choose to leave these exposed because I thought it looked pretty cool.
Then I'm sanding the edges here to create a light chamfer and then I'm finishing the walnut with some of my tung oil wax polish and it really brings out the color.
Now for the underside, all the electronics are exposed, so I want to add some protection, yet have plenty of air flow, so I picked up some fine wire mesh at the craft store. So cutting to size, and then just attaching with a couple of small screws, and that looks good.
Then finally I'm soldering the light on. Let's plug it in and see if it works.
OK, and you can move the arms around, move the light around, place it wherever you need it. And of course this is really nice to have when you want to hold something in place, for soldering or whatever.